
Avatar Settings
Attendees in venues are represented by Avatars which can take on one of three forms:
- Video Avatars that display the attendee's webcam feed in a circle.
- Image Avatars that display a circular image avatar instead of the webcam feed, chosen from a set of images that you designate.
- Character Avatars that display an arbitrarily-shaped image avatar that can be animated to respond to movement.
All avatars also feature a nametag to display the attendee's handle, can optionally feature extended nametags that appear when the avatar is hovered over, and can also broadcast the attendee's microphone.
Avatars can also be disabled outright. This setting and all other avatar settings can be set at the venue level, or can be fine-tuned per room.
⚠️ Video Avatars can very slightly slow down attendee browsers in a way that becomes more apparent the more video avatars are present! For this reason, rooms using video avatars have a maximum headcount setting of 10.
Basic Settings

Basic venue-level avatar settings can be changed by clicking "Avatar Config" in the list of rooms.
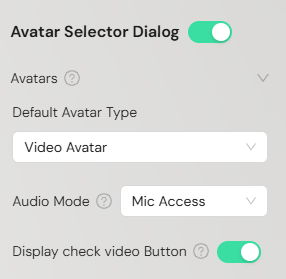
To enable or disable avatars entirely, simply use the toggle next to Avatar Selector Dialog. If this is disabled, avatars will not be used unless overridden at the room level, and the avatar creation screen will not be shown to attendees.
There are two primary options for avatars: The Avatar Type, and the Audio Mode.
- Avatar Type: This determines the form that your avatars will take by default. Avatars can be Video, Image, or Character avatars (as described above).
- Audio Mode: This determines whether or not microphones are enabled by default.
Extra Avatar Customization
Image and Character avatars come with some extra options that are required due to their nature. If these avatar types are selected, then these extra options will appear below the basic settings.
Image Avatars
🙌 If you don't upload any images, the default avatar will be a circle with the attendee's initials within.
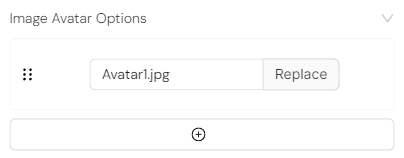
Image avatars require one or more images to be provided for use as graphical depictions of the attendee. Upon selecting this type, you will be able to add an arbitrary amount of images by expanding the "Image Avatar Options" dropdown, pressing the long "+" button to add an entry to the list, and then pressing "Add Image" to populate that entry with an image selected from your list of assets. The list can be rearranged by clicking and dragging the six dots beside any entry, and the resulting list of images presented to aspiring attendees will be shown in this order. To delete any entry, simply hover over it in the list and press the trashbin icon that appears.
🙌 All avatars will be shown as a circle, clipping off edges as necessary. For best results, upload a medium-sized square image with no important details at the corners of the image.
Character Avatars
🙌 To use character avatars, you will need a spritesheet (a grid containing the frames of animation) depicting each avatar character. Ideally, you will also want to break your spritesheets up into an "idle" animation sheet and a "moving" sheet.
Character avatars are similar to image avatars, except they are designed to animate spritesheets instead of simply displaying still images. Like image avatars, you can add an arbitrary amount of animated characters to choose from using the long "+" button. However unlike image list entries, character entries contain a set of subsettings for each individual character.
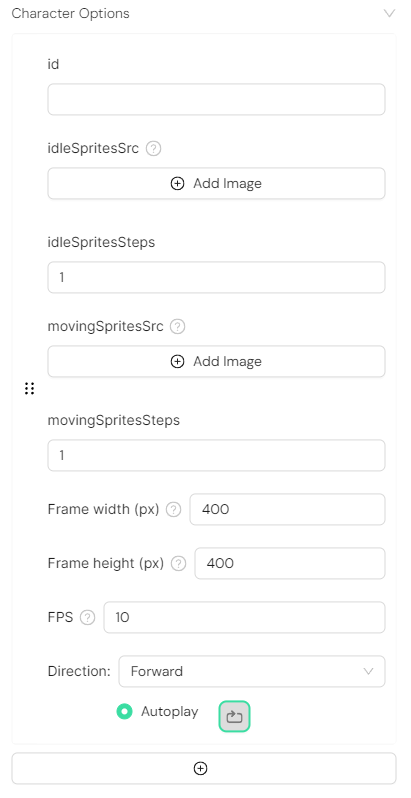
- ID: This is an internal name to allow editors to distinguish between different characters.
- Idle Sprite Source: This is the main spritesheet that will be displayed when the attendee is sitting still.
- Idle Sprite Steps: This denotes how many frames on your idle spritesheet should be iterated through to compose your idle animation.
- Moving Sprite Source: This is the spritesheet that will be switched to when the attendee is actively moving around a room.
- Moving Sprite Steps: This is the same as the Idle Sprite Steps, but for your movement spritesheet.
- Frame Width/Height: This denotes the size (in pixels) that your spritesheet grid should be, and thus how large each frame is in your sheet(s).
- FPS: This is how many frames of animation will be played per second. A higher number will result in a faster animation.
- Direction: This denotes whether your spritesheet will be read from the top-left down to the bottom-right of the sheet, or from bottom-right up to top-left.
- Autoplay: This toggles whether or not the animation(s) will begin playing when the attendee enters. If this is disabled, then the animation will be frozen on the first frame(s) until overridden.
- Loop: This determines whether or not the animation(s) will loop back to the start when it reaches its last frame. If this is disabled, then the animation will freeze on the last frame until the attendee leaves the room.
- Anchorpoint at Base: By default, character avatars will move the centroid of the avatar to the cursor when clicking on movement zones. If this is checked, the avatar will instead move the bottom edge of the avatar to the cursor when moving, allowing for more natural movement for humanoid character sprites.
⚠ Spritesheets are always read from either the top-left or the bottom-right depending on direction. It is not possible to "jump over" unwanted frames or start from an arbitrary point in the sheet. Ensure that different animations are broken up into separate spritesheets if this is desired.
Room Overrides
Avatar settings can also be overridden on a per-room basis. This can be used to do things like hide webcams until a specific room is reached, or anonymize attendees in a room or subset of rooms.

To enable a room override, navigate to the room in question in the designer and, with no tools selected, toggle "Avatar Override" in the right-hand inspector. This will subsequently display the same basic settings shown above. Any changes made here will override the corresponding avatar setting for this room only, and any attendees visiting this room will be presented with a second avatar creation screen asking them to recreate their avatar for the room. If the overriding settings would require additional browser permissions, these will also be asked for here.
Additionally, the Audio Mode option has one additional mode exclusive to room overrides: Mute on Entry. This mode will automatically mute the microphones of attendees who enter the venue, but will still allow the attendee to manually unmute themselves as normal after arriving in the room.
Advanced Settings
Aside from customizing avatars, the avatar creation screen itself can also be customized via the Avatar Configuration settings available below the standard avatar settings.
These settings are disabled by default (which will result in POPUP using the default avatar creation layout) but can be enabled and populated with any of the following features:
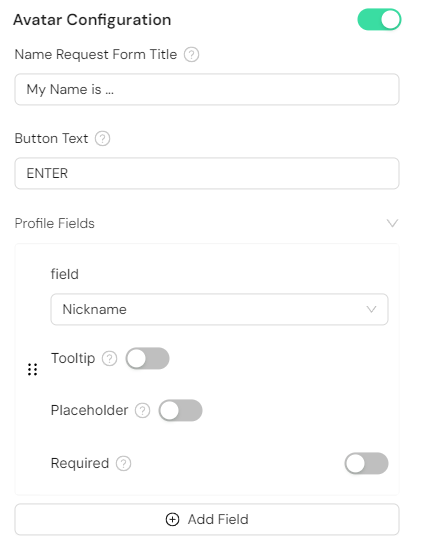
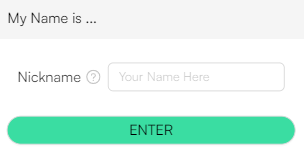
- Name Request Form Title: This is the heading that will appear to attendees at the top of your avatar creation screen
- Button Text: This is the text that will appear in the confirmation button at the bottom of the screen.
- Profile Fields: This is a list of all the detail fields that will be presented to the attendee to fill out on the creation screen. By default, all new venues start with a required "Nickname" field, however this can also be changed if desired. Every field will also have several subsettings:
- Field: This allows you to select the behaviour of this field. You can choose from "Nickname", "Full Name", and "Custom" for this option.
- Nickname: This will be the short name or handle that will always be displayed below the avatar.
- Full Name: This is the extended name or handle that will be displayed in a profile card when other attendees hover their cursor over the avatar. This field will also attempt to autofill the nickname field appropriately if attendees fill it in before they enter a nickname of their own.
- Custom: This can display any miscellaneous information in a subsection within the avatar's profile card. Unlike nicknames and full names, you can add an arbitrary amount of custom fields and each field's data will be displayed on a new line within the profile card.
- Field Name (Custom fields only): This allows you to denote to attendees what information should be entered into this specific field.
- Tooltip: If enabled, this will allow you to provide an explanatory tooltip to describe what should be entered into the field in greater detail.
- Placeholder: If enabled, this will be the example text that displays within the field before the attendee adds their own information to it.
- Required: If enabled, this will require the attendee to fill out this field before they will be granted entry into the venue.
- Field: This allows you to select the behaviour of this field. You can choose from "Nickname", "Full Name", and "Custom" for this option.
Similar to other lists, profile fields can be rearranged by clicking and dragging the six dots next to any entry, and can be duplicated or deleted by hovering your cursor over the entry in question and clicking the copy icon or the trashbin icon, respectively.

Avatar Size
Avatars can be set to simulate forced perspectives while moving around in a room. To enable this feature, turn on "Position-based Scaling" in the "Avatar Size" section of a room's right-hand inspector.

Two further settings are available:
- Scale: This multiplier determines how much larger or smaller an avatar will become when it is at the top edge of the room. Values lower than 1 will result in the avatar shrinking as it moves upward, while values higher than 1 will result in the avatar growing.
- Base Size: This is the size of the avatar when it is at the bottom edge of the room, and is the number which will be multiplied by the Scale value to calculate the final avatar size at the top edge.
- If Position-based Scaling is disabled, this is the size that avatars will be at all times while in the room.